How to Arrange Floating Shelves: Best Complete Guide

The difference between floating shelves that look intentional and floating shelves that look like an afterthought comes down to three decisions: where to position them on the wall, how to space them relative to each other, and what to put on them. The shelves themselves are just horizontal surfaces. The arrangement is what turns them into a design feature.
Most arrangement problems come from skipping one of those three decisions. Shelves get mounted at random heights. Items get placed without a plan. Spacing gets eyeballed instead of measured. The result is a display that feels cluttered, unbalanced, or disconnected from the room.
This guide covers seven layout patterns, the styling rules that professional stylists use, exact spacing formulas, and the most common arrangement mistakes with specific fixes.
7 Floating Shelf Layout Patterns
Each layout creates a different visual effect. The right pattern depends on the wall size, the room's design style, and how many shelves you are working with.
1. Horizontal Stack (Aligned and Even)

Two or three shelves mounted directly above each other at equal intervals. All shelves are the same length, centered on the same vertical axis.
Visual effect: Clean, orderly, and symmetrical. The eye moves straight up and down. This is the most common layout and the safest choice for beginners.
Works best in: Bathrooms (above the toilet), kitchens (between countertop and upper cabinets), narrow hallways, and small bedrooms. Anywhere the wall width is limited and the display needs structure.
Spacing: 10 to 12 inches between shelves for books and taller items. 8 to 10 inches for small decor and picture frames. See the spacing section below for the exact formula.
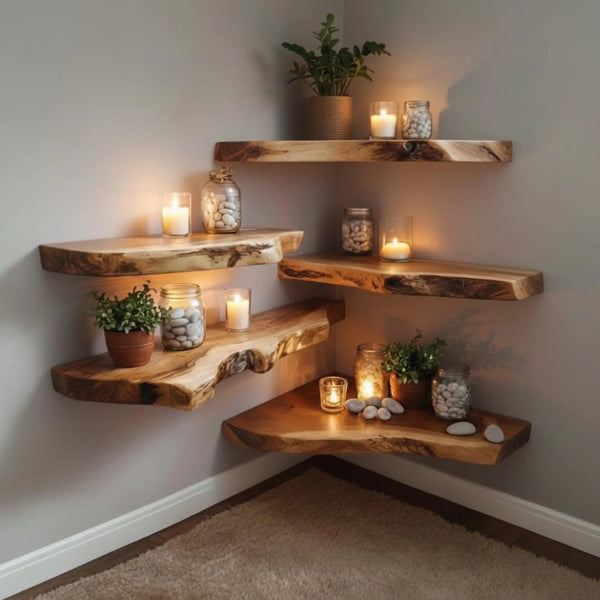
2. Staggered (Offset Heights)

Shelves mounted at alternating heights, like steps. The shelves can be the same length or different lengths. Each shelf sits higher or lower than the one beside it.
Visual effect: Dynamic, casual, and modern. The eye zigzags across the wall, creating movement. Staggered layouts feel less rigid than horizontal stacks and hide imperfect wall surfaces better because the asymmetry draws attention away from the wall itself.
Works best in: Living rooms, creative spaces, bohemian-style rooms, and open-plan areas where you want the wall to feel active.
Tip: Keep a consistent vertical offset between shelves (4 to 6 inches difference in height between adjacent shelves). Random offsets look accidental. Consistent offsets look intentional.
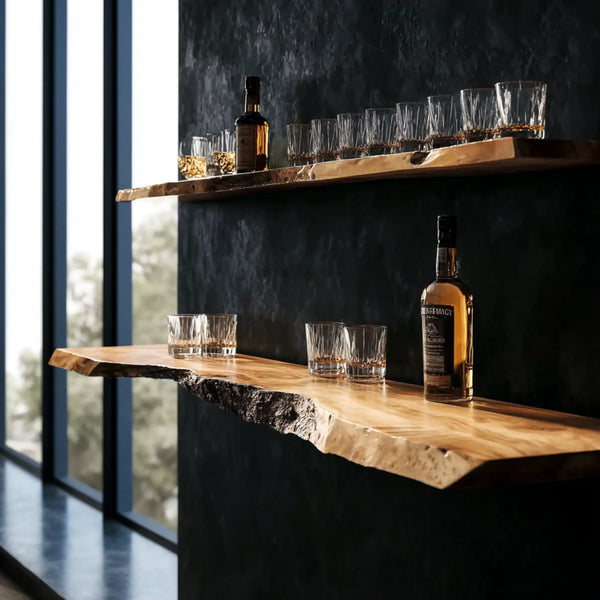
3. Horizontal Row (Side by Side)

Three shelves placed on the same horizontal line with equal gaps between them. Each shelf is typically the same length (24 to 36 inches).
Visual effect: Wide, expansive, and symmetrical. Draws the eye across the wall horizontally, making the wall feel wider. This layout works like a visual horizon line.
Works best in: Above a sofa, above a bed headboard, and along long hallway walls. Anywhere you want to emphasize horizontal space.
Spacing between shelves (horizontally): 4 to 8 inches. Too much gap breaks the visual connection between shelves. Too little makes them look like one long shelf that was cut into pieces.
4. Cascading (Longest at Bottom)

The bottom shelf is the longest. Each shelf above it is shorter, creating a pyramid or waterfall shape. The shelves are center-aligned or flush on one side.
Visual effect: Grounded and architectural. The wide base creates visual weight at the bottom, which feels stable and anchored. This layout mimics the natural proportions of furniture: wider at the base, narrower at the top.
Works best in: Living rooms (as a statement wall), dining rooms, and home offices where the shelves replace a bookcase.
Dimensions example: Bottom shelf 48 inches, middle shelf 36 inches, top shelf 24 inches. Space them 10 to 12 inches apart vertically.
5. Asymmetrical Cluster

A group of shelves in different lengths mounted at irregular heights and positions. No two shelves share the same vertical or horizontal line.
Visual effect: Artistic, eclectic, and gallery-like. Each shelf reads as an independent element. The cluster creates a composition that resembles a curated art wall.
Works best in: Living room feature walls, creative studios, and Japandi-style rooms where minimal objects on each shelf make the arrangement itself the focal point.
Critical rule: Asymmetrical does not mean random. Use an imaginary grid to keep the overall cluster balanced. The total visual weight (shelf length plus items displayed) on the left side should roughly equal the right side, even if individual shelf positions differ.
6. Grid (Uniform Rows and Columns)

Four or more shelves arranged in a 2x2, 2x3, or 3x3 grid with equal horizontal and vertical spacing. All shelves are the same length.
Visual effect: Structured, organized, and gallery-like. The grid imposes order on the display and works especially well when all shelves hold similar categories of items (all books, all plants, all framed photos).
Works best in: Kitchens (replacing upper cabinets), dining rooms (displaying dishes), and media walls flanking a TV.
Spacing: Equal horizontal and vertical gaps create the cleanest grid. 10 inches is a common starting point for both directions.
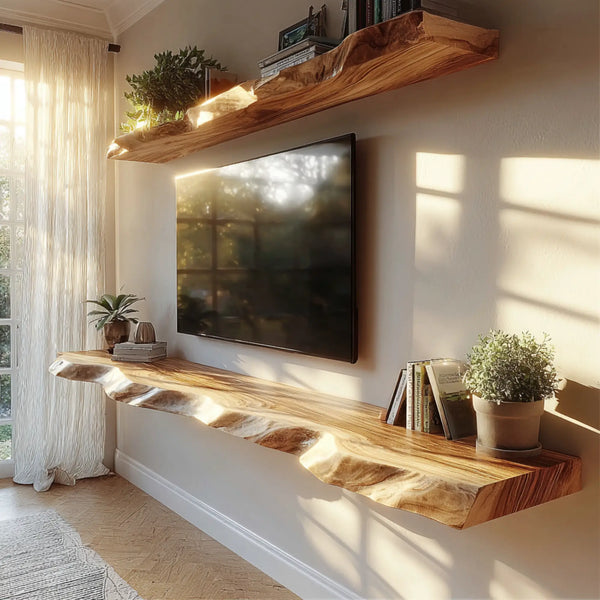
7. Single Statement Shelf

One long shelf (48 to 72 inches) mounted as a solo element. The shelf carries the entire display, and its length makes it a visual anchor for the wall.
Visual effect: Bold, simple, and focused. A single shelf avoids the complexity of multi-shelf layout decisions and puts all attention on the objects displayed.
Works best in: Entryways (for keys, mail, and a small plant), bedrooms (replacing a floating bedside table), and above a fireplace mantel.
Shelf choice matters here. A single statement shelf needs visual substance. Thin, lightweight MDF disappears on a large wall. A thick solid hardwood shelf with visible grain, like a live-edge Suar wood shelf, holds the wall on its own because the material has enough visual weight and texture to command attention.
How to Style Items on Floating Shelves
The layout gets the shelves on the wall. Styling gets the right objects on the shelves in the right positions. These five rules cover the principles professional stylists use.
Group in Odd Numbers
The human eye finds odd-numbered groups more visually interesting than even-numbered groups. Place items in clusters of 3, 5, or 7. A tall vase, a short candle, and a small framed photo. A stack of books, a ceramic bowl, and a trailing plant. Three items create a triangle that the eye naturally follows.
Why it works: Even numbers create symmetry within the group, which reads as static and predictable. Odd numbers create slight asymmetry, which feels more natural and holds attention longer.
Layer Front to Back
Create depth by placing items in three layers. Lean a piece of wall art or a framed photo against the wall at the back. Position medium-height items like books or a vase in the middle. Place small objects (a candle, a small sculpture, a tiny plant pot) at the front edge.
This layering creates a three-dimensional display instead of a flat line of objects. The back layer acts as a backdrop, the middle layer carries the main visual weight, and the front layer adds detail.
Vary Heights Within Each Shelf
Avoid placing items of identical height next to each other. The eye reads a flat line of equally tall objects as a wall. Instead, alternate between tall, medium, and short items. A tall plant next to a short stack of books next to a medium vase creates a visual rhythm that moves the eye across the shelf.
Quick formula: Tallest item on the left, shortest in the center, medium on the right. Or reverse it. The point is variation, not a specific order.
Leave 30 to 40% of the Shelf Empty
The most common floating shelf mistake is filling every inch of surface. Professional stylists deliberately leave a third to almost half of the shelf surface empty. This negative space gives each object room to breathe and prevents the display from looking like a storage shelf.
How to test it: If you cannot see the shelf surface between most items, you have too much on the shelf. Remove items until you can see clear gaps between groups.
Use the X-Pattern Across Multiple Shelves
When arranging items on two or more stacked shelves, imagine an X drawn across all shelves. Place tall items at the top-left and bottom-right (or top-right and bottom-left). Place shorter items at the remaining corners. This diagonal placement distributes visual weight evenly and prevents the display from looking top-heavy or lopsided.
Example with three stacked shelves: Place a tall plant on the left end of the top shelf. On the middle shelf, center a framed photo leaning against the wall. On the bottom shelf, place a stack of books on the right end. The three focal points form a diagonal line that leads the eye smoothly from top to bottom.
Floating Shelf Spacing: The Measurement Formula
Spacing between shelves determines what you can display and how the arrangement feels. Too close limits tall items. Too far apart disconnects the shelves visually.
Vertical Spacing Between Stacked Shelves
The standard recommendation of "8 to 12 inches" appears everywhere, but it hides the logic. The correct spacing depends on what the shelves will hold.
Formula: Measure the tallest item you plan to display. Add 2 to 3 inches of clearance above it. That total is your spacing.
Display Content |
Tallest Item Height |
Spacing (Item + Clearance) |
Small decor, candles, picture frames |
6 to 8 inches |
8 to 10 inches |
Books (standing upright) |
9 to 11 inches |
11 to 13 inches |
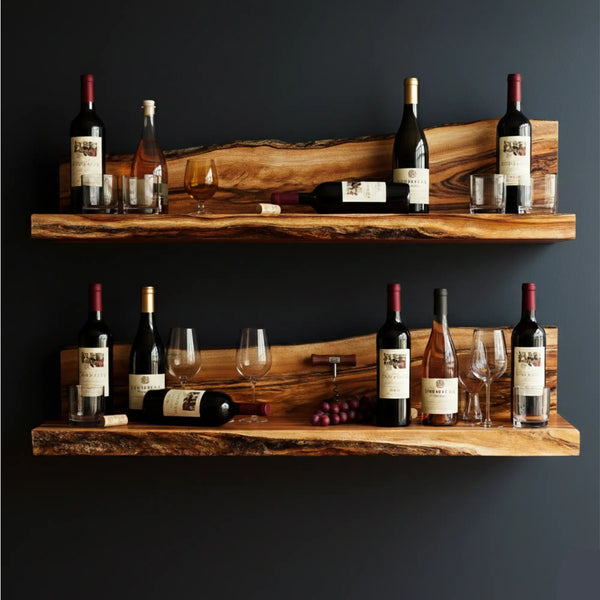
Tall vases, large plants |
12 to 16 inches |
14 to 18 inches |
Wine bottles (standing) |
12 to 13 inches |
14 to 15 inches |
For more on spacing decisions, see our floating shelf spacing guide.
Height From Floor
Mount the bottom shelf at 48 to 60 inches from the floor for standalone display walls. When mounted above furniture, leave 6 to 10 inches between the top of the furniture and the bottom of the lowest shelf.
Spacing Above a Sofa
The bottom shelf should sit 8 to 12 inches above the sofa back. Higher than 12 inches creates a visual disconnect between the shelf and the furniture below. Lower than 8 inches risks contact when someone leans back.
Spacing in a Bathroom
Shelves above a toilet should start at least 12 inches above the toilet tank lid. Space shelves 8 to 10 inches apart, since bathroom items (towels, jars, small plants) are typically shorter than living room display items.
Frequently Asked Questions
How do you arrange 3 floating shelves on a wall?
The most reliable layout for three shelves is a horizontal stack: all three shelves centered above each other with equal vertical spacing (10 to 12 inches). Use the X-pattern for styling: place a tall item on the left of the top shelf, center an item on the middle shelf, and place a tall item on the right of the bottom shelf. This diagonal placement distributes visual weight evenly.
What should I put on floating shelves in a living room?
Mix functional and decorative items: books (stacked horizontally and vertically), framed photos or artwork leaned against the wall, ceramic vases, small potted plants, candles, and one or two unique personal objects (travel souvenirs, collected pottery, small sculptures). Keep 30 to 40% of the shelf surface empty.
How do you make floating shelves look balanced?
Balance comes from distributing visual weight evenly. Use the X-pattern across multiple shelves. Within each shelf, group items in clusters of 3 and vary their heights. Place taller items at the ends and shorter items in the center (or reverse it). Make sure neither the left nor right side of the arrangement feels noticeably heavier than the other.
Do floating shelves need to match the room's furniture?
Not exactly match, but visually connect. If the room has warm-toned wood furniture, choose shelves in a similar wood family. If the room has cool, modern metallics, consider matte black or dark-stained shelves. The shelf material and finish should feel like it belongs in the room, not like it came from a different space.
How many items should go on each floating shelf?
Three to seven items per 36-inch shelf, grouped into one or two clusters with clear space between them. Fewer items read as minimal and curated. More items risk looking cluttered. The deciding factor is negative space: if you can see the shelf surface between and around all items, the count is right. If items touch each other across the shelf, remove some.
Conclusion
A solid hardwood floating shelf is a beautiful starting point. The arrangement turns it into a design feature that anchors the room. Choose a layout pattern that fits the wall. Apply the five styling rules. Use the spacing formula instead of guessing. Start with more negative space than you think you need.